Saturday, January 15, 2011

A little tour of my outside area

I decided today to give you all a glimpse of our outside area around the house, we live on 1 acre approx 12 Kilometres outside a town, but very handy as we have a dairy on the corner of our road, and also a garage, plus its only 10mins drive tops to work so I get to come home for lunch each day.  We have no neighbours either side just paddocks and nothing out the front of us apart from the road and then down to a stream so its very quiet and peaceful here.  We have large hedges to the front and down the driveway which we planted a few years ago, so we are totally private and cant be seen from the road. 

Right I am taking you on a walk around the grounds LOL
This is to the left of my house coming around from the back door (we only use the back door)


Just around the corner from there coming to my front window - the wee fence you see there is our inner area which leads out to the rest of the section - we can close it off if necessary 
 same view from the side of the front of the house about to walk through the wee opening to the right
 View from the gate opening to the edge of our frontage, where that large hedge is which has thousands of birds in it at the moment, as you walk over towards there - there is such a flurry of birds its quite amazing
 View to the left where up against the fence is our driveway - as you can see its very very dry here at the moment we are normally very green even in the summer
 Front taken from the left going around the section basically I am doing a semi circle walk around outside in the tree area
 going down to the right hand side of the property all the trees you see to the right here are out inner border of trees next to the house
 Another view walking to the other side of the property
 View down the length of the right hand side from the front

 Looking back from my back area out to the front hedge again - to the right there my husband has what I call the trifods, which is a huge pumpkin patch
 Looking from the back of our property down the driveway out to the road
 This is our fallen over plum tree, it fell over in high winds a few years ago and is a very old tree, by the summer of that year it had kept growing but with a sort of underpass under it and the roots all up in the air, so we decided to leave it as a feature and hubby will make a small garden around it, plus we get heaps of plums off it usually
So I hope you enjoyed the wee tour around the property, nice to get some insights into where people live etc methinks

Revamp of the worlds ugliest bathroom - picture heavy lots of pics

As the title says - this is what I have been doing in my holidays....  apart from 4 days in bed with a nasty tummy bug.   A whole lot of hard work and elbow grease.   NOW before we go to the pics of the before and afters, we did not revamp our bathroom with new fittings etc no way could we afford to do that bathrooms are an expensive item indeed so it is a paint and color makeover to make it presentable and easier to keep clean.   When we moved into this old place we did paint and pull up carpet etc in most of the rooms but the bathroom has forever remained in the too hard basket or "we ran out of steam" basket LOL.   This old place was rented out for many many years, mainly to students - so you can imagine the state of most of the rooms when we brought it, some rooms they had stood back and flicked paint with a paint brush to get the effect that they wanted, psychedelic but in browns and yellows Eeeeeeeeeeek,.  

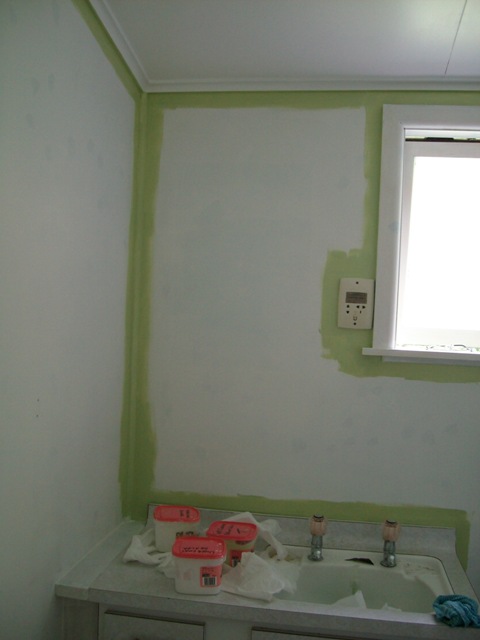
So onto the bathroom, the before pics I have taken with no shame LOL........ messy as heck as we had already started to setup and sand and fill in there when I started taking photos, you will notice the polka dots on the walls, well this was a special paint to cover rust and other "things" that were on the wall that a painter friend gave to me, brilliant stuff but boy what a shit to cover up, a few coats of undercoat went on those ceilings and walls.  Also the nasty lino on the floor is coming up but we left it there while we painted - I have managed to get about one third of it up so far but it will take a while to get it all lifted as it is well glued down - but nice wooden floorboards underneath.


Before - OMG ...... look at the polka dots LOL I went a bit berserk with this paint - as you do - the colour on the walls was that green/blue/teal colour they used to have in hospitals - I figure that the bathroom has never been touched before and was pretty original as I went down to bare walls when sanding at times - yes I know the vanity is ugly but it has to stay for now.  This is actually quite a large room for a bathroom with lots of wall by the bath which will need some art or something to break it up a bit.


Next pics of the progress being made heaps of undercoat on walls already noticing a difference - lots of days of prep work involved before even getting to the painting stage as you can see from the above pics - ahh polka dots getting covered - that was a mission


 In this photo you can see the floorboards - still some glue etc on the floor but I shall worry about getting that up later on will be a bit at a time job as its well glued


Starting to cut in the paint color ready to roll the main walls - YES IT IS COLOUR - this house needs colour its not a white or cream type of house being old and a bit bitsy piecy and colour hides a multitude of sins hehe

 
You will notice the handrails by the shower - we put these in when we had my mum living with us to help her get into the shower from the wheelchair - we decided to leave them there as who knows we may need them ourselves one day.


TA DA THE FINISH - There is still things to do like putting the towel rails back up and the walls need something - and of course I have not yet got all the lino up, but mostly done thank goodness


One final before and after pic together just for reference 


Sunday, January 2, 2011

My Friend Amanda is having a 100 post giveaway

I must admit I don't normally do the link to giveaways thing very often but Amanda is pretty special  - 

so here is the link to go and sign up Amandas Blog

Sunday, December 26, 2010

Holidays holidays holidays yipeeeeeeeee


Wahoo second day of my holidays and I have been out and started tidying up the craft studio which I have not been in for weeks.  While I was in there pottering about I suddenly found the urge to start sewing again and picked up a UFO that had been on the design wall a while back and started to sew - phew so glad that happened was thinking I had lost it LOL......

Next is to tidy up the mess of the sculpting table - Oh my goodness what a mess........ I sooo want to get in there and practice my sculpting again.

Funky quilt I will finish this week (fingers crossed and double crossed)
Messy messy messy LOL

Yes I know I am not supposed to be here, you come any closer and my paw will rip you to pieces (no kidding its totally capable of doing that, you should see the bruises on my leg from an altercation in the middle of the night)

Monday, November 22, 2010

Finally an UPDATE on the blog - Warning Picture Heavy LOL

Hi everyone, yes finally an update to the blog its been a while, been busy at work of course really really busy the past few months and basically have been coming home and hitting the zzzzzzzzz's.    BUT in amongst that I have been busy sewing but unfortunately have not been able to show what I was working on until today.


I belong to an online email group called CRAFT which has become an amazing bunch of friends from all over the world and as time goes on we are all getting opportunities to meet each other which is amazing.  We have built some wonderful friendships in this group and the owner of the group is fantastic (and of course the moderators  hehe )     

The girls decided we needed to show Khris our appreciation for all that she does and so a quilt was born LOL.......  I decided on a heart pattern that would work and sent it out to all the girls as a template so they could make a heart and send back to me to make up.  Some were unable to make a heart so contributed some money to me to enable me to purchase some Frolic fabric for the quilt.  (thanks girls)

Khris got her quilt yesterday so now I am going to show the in progress pics and the completed quilt - PLUS a fantastic bag that Pam made of the same fabric which is just incredible, I really wanted to keep it for myself.   Ok here we go lots of pictures 

Lovely Frolic fabric we brought and of course in the second picture the obligatory owl fabric LOL (for those that know Khris well)


Some of the hearts on their backgrounds awaiting borders etc, I tried to match each heart up with an appropriate fabric to make the most of each hearts colors etc 
 Ahhh heres Khris herself waiting to get her heels on LOL

Some hearts with borders on the design wall while I was pondering what to do next for the middle panel, I ended up designing this as I went basically to fit hearts and "Khris" into the middle  and also to get the colors right for each block 
 Woohoo nearly there on the top, starting to get into shape now and Khris has her heels

 Middle panel sorted took me a while to decide how best to break this up
 A flimsy all ready to go...... waiting for backing and quilting - nice owl fabric borders

 Some of the quilting up a bit closer - quilt is crinkly its been through the washing machine and dryer with my heart pounding the whole time too scared to open the washing machine   EEEEEK
 Another close up of the quilting and middle

 Gorgeous bag that Pam made its fantastic and the zip well I really need to make a bag with a zip like this its perfectly done
 Seee perfect zip I love it


Khris with her bag

KHRIS WITH THE QUILT

 Which needs a good press after being in the dryer and in the post...... LOL